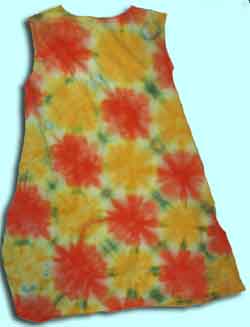
Little girl's dress dip-dyed with yellow and orange flowers, and green leaves
Dip dyeing is a way to get the lovely continuous color gradations seen in low water immersion dyeing, while gaining more control over the end result.
You can dip whole garments, one edge at a time, but I tend to fold the garments first, so as to get a much easier package to work with, and to produce specific repeating patterns.
As in other forms of hand Procion MX dyeing, study the How to Dye basic recipe first.
 Fold the fabric. For precision folding, it helps to
use an iron, making crisp sharp folds at regular intervals. You can fold
in many different ways, just as in tie dyeing. I prefer to avoid the
use of any ties, except perhaps a very loose rubber band to help
hold the packet together. Any ties represent not only white resist
regions, but also a path along which color can creep on the outside
of the packet, sometimes resulting in very dramatic lines on just two
of the many fold faces.
Fold the fabric. For precision folding, it helps to
use an iron, making crisp sharp folds at regular intervals. You can fold
in many different ways, just as in tie dyeing. I prefer to avoid the
use of any ties, except perhaps a very loose rubber band to help
hold the packet together. Any ties represent not only white resist
regions, but also a path along which color can creep on the outside
of the packet, sometimes resulting in very dramatic lines on just two
of the many fold faces.
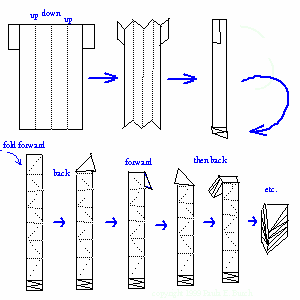
The "flower' pattern is produced by first accordian-folding your garment or yardage to make a long narrow rectangle, then folding the fabric back and forth in the shape of a triangle. Any fold pattern you choose should be folded back and forth, accordian style, rather than over and over as you might fold a sheet to put it away, so that no edge is enclosed within another edge, but instead every edge is available for exposure to the dye.
Mix the dye. See the How to Dye basic recipe. Omit salt or urea - just mix dye and water. (Use water softener if your water is very hard.)
Dip the fabric. Here's the fun part, watching one color creep up along the fabric, then watching the next color 'chase' the first color along up. The subsequent color mixes only at the edges, as the preceding color wicks further up the fabric.
You can dip corners of whole edges in the dye, or use a 5 ml eyedropper (sold in pharmacies for dispensing medication to young children) to add dye to a small region of one side. Repeat with multiple colors on various parts of your fabric until little or no white remains. Do not immerse one face of the folded fabric - just edges - so that you can be sure that what you see creeping up the side of the packet is identical to what is happening inside.
In the 'flower fold' example, the corner of the fabric bundle is the center of the flower; the flower is often circular when unfolded. Dip once for the flower petal color, then again for the color that marks the center of the flower. Dip only for a very short time if you want a small flower center!
Fixing the dye. Follow the method described in "Fixing the dye" on the low water immersion page. Calculate how much dye liquid your fabric has absorbed, adding it all up together (and subtracting the amount left in the containers after dipping), then use a total of 1 teaspoon (5 ml) soda ash per cup (250 ml) of water - including the cup or so that you dissolve the soda ash in for this final step.
Some of the dye will float off of the fabric and mix into the soda ash solution. Some may get on other parts of the dyed fabric, disturbing the perfection of your design. This is usually not a problem, but keep it in mind if you're feeling very perfectionistic. I consider the accidents created by this to be mostly positive, especially since the subtle mixtures of colors can be very beautiful compared to the harder color edges you may see when the soda ash is instead applied as a pre-soak. However, a new technique introduced to the Dyerslist mailing list community by Doug Wilson is simply to use a saturated salt solution to dissolve the soda ash in, and put the (drained) garment into it to fix. The high concentration of salt prevents dye transfer. What a great idea! (A saturated salt solution is one in which so much salt has been dissolved in the water that no more can be dissolved, as evidenced by the presence of some undissolved salt. Use about two cups of salt per gallon.)
Alternatively, you can add the soda ash with the dye. This may result in less subtle gradations, but you might find it a little easier.
Reaction Time. You must then leave the soda ash to react with the fabric and dye for a miniumum of one hour, up to 24 or 48 hours under some conditions. See 'Reaction Time' on the low water immersion page for more details. Alternatively, you may seal the working container with plastic wrap, if it is microwaveable, and, after allowing the dye to soak into the fabric well, microwave just until the bowl is very hot, but not to the point that the plastic wrap would be blown off by the steam. (Warning: never microwave dry fabric, as it will burn.)
Washing out. Wash out as usual - first with cold water, then (if the fabric can handle it) hot water, preferably using Synthrapol SP detergent, or another detergent specially formulated for dyers. Except for the first rinsing, use the hottest water that the garment can handle, for most effeicient removal of excess unattached dye.
All of the pages on this site are copyright © 1998-2026 Paula E. Burch, Ph.D.
Page created: November 7, 1999
Last updated: March 12, 2008
Downloaded: Friday, July 31, 2026