Affiliate link
Advertisements
Dye Cotton, Rayon, or Silk with Procion MX
Fiber Reactive Dyes
Peace signs are a favorite in tie-dye design, largely for historical reasons: though few tie-dyers in the 1960s, when tie-dye first became fashionable, had the right dye, or the expertise, to do anything more complicated than a few circles, they did wear a lot of peace signs in other forms. Current political events are making peace signs more popular than ever, now.
How can you make your own tie-dyed peace sign? There are many ways. Note that most people say "tie dyeing" to indicate any form of hand dyeing with bright colors, not necessarily tie-dyeing specifically.
Some tie-dye studios selling t-shirts on the web do actually tie-dye peace signs. This is relatively rare, though. Most squirt or print the dye on, a much easier method, especially in mass quantities, while labeling the results as "tie dyes", even though no tying was done. Unfortunately, this is generally done to cut costs, rather than to add greater control and complexity to the design, which can be the great advantage of this method for an artist.
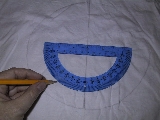
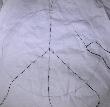
 Most methods require, for best results, that you draw
your peace sign first. The more precise you are in doing
this, the more professional-looking your results will
be. Use a pencil, ruler, and protractor. (Where do you buy a
protractor? Most drug stores carry them, quite cheaply, at
least in the US; otherwise, look for an office or school
supply store.) Be careful to make the vertical line centered
and vertical on the shirt, unless you have other
plans. Place the angled lines at 45 degrees from the
vertical line. Use a compass, or a carefully centered dinner
plate, to draw your circle. Now you are ready to proceed to
one of the methods below.
Most methods require, for best results, that you draw
your peace sign first. The more precise you are in doing
this, the more professional-looking your results will
be. Use a pencil, ruler, and protractor. (Where do you buy a
protractor? Most drug stores carry them, quite cheaply, at
least in the US; otherwise, look for an office or school
supply store.) Be careful to make the vertical line centered
and vertical on the shirt, unless you have other
plans. Place the angled lines at 45 degrees from the
vertical line. Use a compass, or a carefully centered dinner
plate, to draw your circle. Now you are ready to proceed to
one of the methods below.
 A very straightforward way to dye a peace sign is to draw
the sign on with melted wax, then soak the (cooled) shirt in
soda ash and dye the shirt in a beautiful design, or use low water immersion dyeing on the waxed garment or fabric. After the
wax is removed, the sign will remain in a lighter color, or
white if you get very good wax penetration. See How to Batik for more
information. You can also draw on appropriate words, with
this technique, or add pictures of simple flowers, etc. Cursive
writing tends to work better, with a tjanting, than do printed
separate letters.
A very straightforward way to dye a peace sign is to draw
the sign on with melted wax, then soak the (cooled) shirt in
soda ash and dye the shirt in a beautiful design, or use low water immersion dyeing on the waxed garment or fabric. After the
wax is removed, the sign will remain in a lighter color, or
white if you get very good wax penetration. See How to Batik for more
information. You can also draw on appropriate words, with
this technique, or add pictures of simple flowers, etc. Cursive
writing tends to work better, with a tjanting, than do printed
separate letters.
Cut out a peace sign, made with wide lines, from sturdy cardboard or very thin stiff plastic, such as plastic cut from a report cover. Put your dye in spray bottles (prepare the dye as in How to Dye), and lightly spray the shirt (first pre-soaked in soda ash solution), in several colors, with your stencil on top of it. After the dye has quit dripping, turn over the shirt and repeat on the other side. Be sure to blot excess dye from your stencil before picking it up.
 A surprisingly good effect can be obtained by rainbow drip-dyeing
the shirt, or using low water immersion dyeing, in various intense colors (see More
Ideas for Dyeing), leaving as little white as
possible - and then ironing on an opaque white peace sign. You can
buy opaque white iron-on computer printer transfer paper (if
you can't find it locally, try Dharma Trading
Company), cut out the shape of the peace sign (cutting
the holes is the hard part), then iron it on, being sure to
fully follow the instructions. (It's disappointing to
realize too late that you've forgotten to remove the backer
paper!) Alternatively, if you have access to screen-printing
supplies, print the design on with regular opaque
screen-printing ink. You can get great peace signs, such as a larger version of the one at the right (click on it),
for free from the clip art archive at PeaceSymbol.org, to
make it easier to cut out a perfect white one, or to print
a more complex or colorful peace sign.
A surprisingly good effect can be obtained by rainbow drip-dyeing
the shirt, or using low water immersion dyeing, in various intense colors (see More
Ideas for Dyeing), leaving as little white as
possible - and then ironing on an opaque white peace sign. You can
buy opaque white iron-on computer printer transfer paper (if
you can't find it locally, try Dharma Trading
Company), cut out the shape of the peace sign (cutting
the holes is the hard part), then iron it on, being sure to
fully follow the instructions. (It's disappointing to
realize too late that you've forgotten to remove the backer
paper!) Alternatively, if you have access to screen-printing
supplies, print the design on with regular opaque
screen-printing ink. You can get great peace signs, such as a larger version of the one at the right (click on it),
for free from the clip art archive at PeaceSymbol.org, to
make it easier to cut out a perfect white one, or to print
a more complex or colorful peace sign.
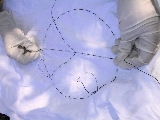
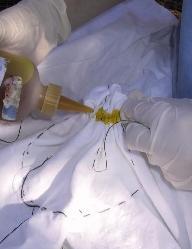
 Just drip on the colors where you want them! Choose a
color which does not migrate far (such as either fuchsia,
also known as red MX-8B, or a purple mixed by combining this
color with turquoise or blue) for the peace design pattern
itself. Choose a color which migrates smoothly throughout
the fabric (such as turquoise MX-G or "sky blue" blue MX-R)
for the background. For this method, be sure to presoak the
fabric in soda ash, as in the traditional tie-dye
recipe; don't use an after-fixing method. For greater
control, line-dry the soda-ash-soaked fabric before pouring
on the dye, and use an easily controlled applicator device -
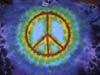
a squirt bottle, a syringe, or a pipette. The illustration to the left shows
a combination of a tie-dyed background with a very carefully drip-dyed
symbol, allowing any combination of colors, regardless of the perperties of the individual dye chemical.
Just drip on the colors where you want them! Choose a
color which does not migrate far (such as either fuchsia,
also known as red MX-8B, or a purple mixed by combining this
color with turquoise or blue) for the peace design pattern
itself. Choose a color which migrates smoothly throughout
the fabric (such as turquoise MX-G or "sky blue" blue MX-R)
for the background. For this method, be sure to presoak the
fabric in soda ash, as in the traditional tie-dye
recipe; don't use an after-fixing method. For greater
control, line-dry the soda-ash-soaked fabric before pouring
on the dye, and use an easily controlled applicator device -
a squirt bottle, a syringe, or a pipette. The illustration to the left shows
a combination of a tie-dyed background with a very carefully drip-dyed
symbol, allowing any combination of colors, regardless of the perperties of the individual dye chemical.
Thicken your dye (otherwise prepared as in How to Dye) with sodium alginate (or any other thickener, sold as suitable for fiber reactive dyes, by any of the dye houses listed on my Sources for Dye Supplies page), and apply with a paint brush. Either pre-soak your fabric in soda ash and line-dry it, before use, or paint dry untreated (prewashed!) fabric, and finish by painting on a sodium silicate solution such as Dharma's After-fix.
You can embellish your tie-dyed shirt, with or without a dyed peace sign on it, by painting on a peace sign in metallic, true fluorescent, or glow-in-the-dark fabric paint. You can get nice results with hand-painting, or more professional looking results by stamping or stenciling, using small stamps or stencils repeatedly to add up to a more ornate peace sign design. Opaque or metallic paints are usually best on dye; the usual transparent fabric paint is pretty subtle when used on top of intense or dark colors. (Beware of transparent paint over pencil lines: pencils lines will wash out even if covered by dye, and will be invisible under opaque fabric paint, but may become permanantly visible under transparent fabric paint.)
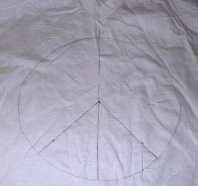
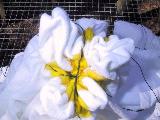
This one takes a little practice, if you haven't tried it before. First draw your peace sign, as above.
It's easy to tie the outer circle, as that is just the standard bulls'-eye rubber band technique. How can you tie those center lines at the same time, though?
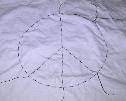 One of several possible methods for true tying, possibly the
easiest, is to sew with the
ties. To do this, use a large-eyed
embroidery needle and some artificial sinew. (Artificial sinew is the best
tie-dyeing cord, and may be found in the leather-working
section of your local crafts store, or large crafts
catalog.) Split the sinew lengthwise to get a piece thin
enough for your large-eye needle; this is very easy to do.
Now sew three lines: one for the vertical line, one
for the slanted crossbars, starting at one side and
proceeding to the other, and a third line to circumscribe
the circle.
One of several possible methods for true tying, possibly the
easiest, is to sew with the
ties. To do this, use a large-eyed
embroidery needle and some artificial sinew. (Artificial sinew is the best
tie-dyeing cord, and may be found in the leather-working
section of your local crafts store, or large crafts
catalog.) Split the sinew lengthwise to get a piece thin
enough for your large-eye needle; this is very easy to do.
Now sew three lines: one for the vertical line, one
for the slanted crossbars, starting at one side and
proceeding to the other, and a third line to circumscribe
the circle.
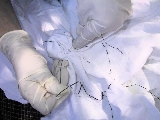
Now grab the ends of the vertical line, and pull them together. Next, add a small amount of dye to delineate the line, then tie the sinew tightly. Repeat this with the slanted cross-pieces, and then finally with the circle around the design, being very careful to pull the four sections that are inside the circle out, so that you can easily apply dye to them, if you wish.
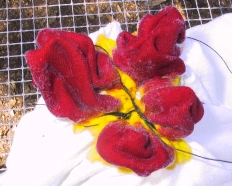
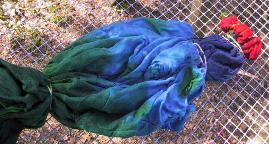
In the example pictured, a major mistake was made: the blue used on the outside of the circle (blue MX-R, a.k.a. "sky blue" or "mixing blue") crept right into the circle; unfortunately, this occurred in an assymetrical way that spoiled the design. The shirt would have worked okay, if only the same color had been used outside the circle as inside it. It might be better to use a non-creeping color such as fuchsia, then, after that has had plenty of time to react with the fabric, soak the whole thing in turquoise, which would turn the fuchsia to purple but leave it in place. Alternatively, one might add a bit of thickener to the dye. In this case, the shirt was presoaked in soda ash and dried, which tends to reduce creeping somewhat, but the sheer amount of unthickened liquid dye used, to prevent unwanted areas of white, was overwhelming.
As you see, tying is the most labor-intensive way to dye a peace sign. You may need several tries before you get the perfect one. It's fun trying, though, isn't it?
 see other answers to questions about dyes
and dyeing
see other answers to questions about dyes
and dyeing
copyright ©2003-2005 Paula E. Burch
Sitemeter says that there have been
visits to the different pages on this site since May 5, 1999.
Page created: April 26, 2003
Last updated: July 26, 2005
Downloaded: Saturday, August 01, 2026