No longer is it difficult to get excellent instruction on how to fold and dye mandalas. Two different videos are now available which show every detail you need to start tie-dyeing your own mandalas. Even if you have already worked out for yourself how to tie-dye a mandala, you will be fascinated to see the different techniques shown by other mandala dyers.
The first DVD which appeared on this subject was Michael Fowler's The Art of Tie-Dye, which shows in detail the folding and tying of kaleidoscopes, flower mandalas, and stars. It's great fun to watch Michael demonstrate his methods in detail, and the exposure to another dye artist can take your own work to a new level. (Note: word has it that this disc is no longer being produced; you may wish to obtain your copy now, rather than waiting until it becomes hard to find.)
Another DVD course in how to tie dye mandalas and stars is True Tie Dye's Advanced Tie Dye Techniques: Making Shapes and Mandalas. The first disc in this two-disc set, Tie Dye 202: Making Shapes with Tie Dye, demonstrates in detail how to tie dye hearts, arrows, peace signs, aliens, and more, while the second of the two discs, Tie Dye 303: Mandalas, Suns and Lotus Blossoms, demonstrates how to tie dye many different mandala designs. Beginners will also want to purchase True Tie Dye's Tie Dye 101: The Basics of Making Exceptional Tie Dye
, or get all three discs in one set, the "Learn How to Tie Dye" complete 3-volume set
. You can also order directly from True Tie Dye; this is especially helpful for those who are in Europe or Australia, as True Tie Dye sells these DVDs in different formats for international use.
You can learn to make your own beautiful tie-dyed mandalas without ever viewing a video, however, if you are willing to invest plenty of time and effort, using the time-honored technique of lots of trial and error. Read on for more information.
 The chief difficulty is that the outermost layer of fabric will tend to get
a lot more dye than inner layers, resulting in a non-symmetric pattern.
You want every sector of the pattern to have exactly the same amount
of dye, in order to get the multiple symmetry. One thing to do is to
fold it accordian-style
rather than over and over, if you can picture that for a circle. The
other is to be careful to apply dye only to the *edges* of the folds,
not to the outer faces, or carefully inject dye inside the
bundle with a syringe. Direct dye application only here, no
vat dyeing.
The chief difficulty is that the outermost layer of fabric will tend to get
a lot more dye than inner layers, resulting in a non-symmetric pattern.
You want every sector of the pattern to have exactly the same amount
of dye, in order to get the multiple symmetry. One thing to do is to
fold it accordian-style
rather than over and over, if you can picture that for a circle. The
other is to be careful to apply dye only to the *edges* of the folds,
not to the outer faces, or carefully inject dye inside the
bundle with a syringe. Direct dye application only here, no
vat dyeing.
It helps to use thin fabric and slightly thickened dye, plus lots of trial and error. Silk t-shirts or thin woven rayon are easier to get fine detail on than thicker cotton knits. The dye thickener is to keep the dye from spreading sideways too much, but too much thickener can interfere with spreading down through the layers.
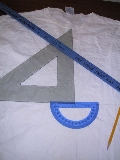
Here's a picture I drew to show you how to fold your shirt or fabric for tie-dyeing a mandala:
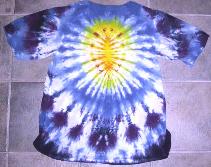
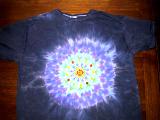
See the "How I did it" section of example 26 in my gallery for actual photos of the folding process and of a tied mandala fold, ready for bleach (in the case of a dark shirt) or dye (for a light-colored one).
See How to Dye for instructions on dyeing cotton or silk with fiber reactive dyes.
Most importantly, do not use all-purpose dye to dye your mandala! On cotton and other plant fibers, use only cool water fiber reactive dyes, such as Procion MX dye, with soda ash to set the dye. On silk, you can use the same fiber reactive dyes with soda ash, at room temperature, or you can use acid dye, along with vinegar and some source of heat.
Putting soda ash into the fabric. If you are dyeing mandalas with fiber reactive dyes, you must have soda ash in the fabric before you add the dye. You can do this by soaking your tied bundle, or, for greater control, you can soak the unfolded fabric in soda ash solution (one cup [250 ml] per gallon [4 liters]) and then line dry, before folding the fabric. Adding dye. Slowly drip dye onto the sections of the tied cone, keeping in mind that dye will spread under the ties no matter how tight you make them, so be sure that adjacent colors are those that will blend nicely together. Use a syringe to inject even more dye inside the bundle. Finishing. Follow the instructions for Dye Reactions and Wash Out given under "Drip Dyed Mandalas", below.
 Another technique has the potential for more detail, more
color, and more control. First pre-soak the fabric or
garment in the usual soda-ash pre-soak (see How to Dye), then line-dry
it.
Another technique has the potential for more detail, more
color, and more control. First pre-soak the fabric or
garment in the usual soda-ash pre-soak (see How to Dye), then line-dry
it.
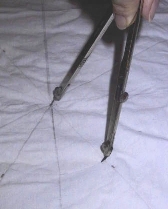
 Draw guidelines first. Smooth the dry fabric out and draw pencil lines in a
geometric pattern, to serve as guides. Draw multiple axes,
evenly spaced, passing through a central point; draw
concentric circles with a compass; draw squares or other
geometric shapes. These are not themselves the design;
instead, they serve as guidelines. Fabric that has been
pre-soaked in soda ash solution and then line-dried is
easier to draw on than untreated fabric. The pencil marks
will wash out later, leaving a clean and perfect dye pattern.
Drip on the dye. Use fiber reactive dye
only, such as Procion MX type dye, dissolved in water, with urea. (See About Dyes for more
information, Sources
for Dyeing Supplies for where to get it, and How to Dye for the full
recipe.)
Carefully drip small
drops of dye at the intersections of the lines, or along the
lines. You can use any sort of dripping device, for varying
degrees of control, from a simple eyedropper, though various
disposable glass or plastic pipettes, all the way up to $200
micropipettes such as are routinely used in biochemistry labs.
(A good source for inexpensive pipettes is
American Science and Surplus.) It's quiet, pleasant work, deciding where to place the drips
of dye so that they are arranged in a pleasingly symmetric
pattern of color. I like to use very small drips near the
center of the design, and larger ones toward the outer edges.
See my gallery for examples and
details, particularly example 21, example 22 and example 23.
Background. You can dye a surrounding background color, either
before or after the mandala itself, by pulling up the center
of the mandala and rubber-banding its circumference, then
carefully pouring dye everywhere but inside this circle. I
prefer to do the background first, so as to not risk
covering up any special details on the mandala, but this is
more trouble.
Dye reactions. Place the newly dyed fabric in a warm
place, so that the dye can react with the soda-presoaked
fabric, a minimum of 70 degrees Fahrenheit (21 degrees
C.). Leave it for twenty-four hours at 70 degrees F. (21 C),
or two to six hours at 90 degrees F. (32 C.).
Wash out. Wash your new mandala in cold
water first, then in hot water (if the fabric can stand it)
to rid the fabric of the last traces of excess dye. Most
dyers like to use Synthrapol detergent, available only from
dye suppliers, for this purpose, but regular laundry
detergent will do. If you have used fiber reactive dyes,
your beautiful new
design is now permanent and wash-proof.
Draw guidelines first. Smooth the dry fabric out and draw pencil lines in a
geometric pattern, to serve as guides. Draw multiple axes,
evenly spaced, passing through a central point; draw
concentric circles with a compass; draw squares or other
geometric shapes. These are not themselves the design;
instead, they serve as guidelines. Fabric that has been
pre-soaked in soda ash solution and then line-dried is
easier to draw on than untreated fabric. The pencil marks
will wash out later, leaving a clean and perfect dye pattern.
Drip on the dye. Use fiber reactive dye
only, such as Procion MX type dye, dissolved in water, with urea. (See About Dyes for more
information, Sources
for Dyeing Supplies for where to get it, and How to Dye for the full
recipe.)
Carefully drip small
drops of dye at the intersections of the lines, or along the
lines. You can use any sort of dripping device, for varying
degrees of control, from a simple eyedropper, though various
disposable glass or plastic pipettes, all the way up to $200
micropipettes such as are routinely used in biochemistry labs.
(A good source for inexpensive pipettes is
American Science and Surplus.) It's quiet, pleasant work, deciding where to place the drips
of dye so that they are arranged in a pleasingly symmetric
pattern of color. I like to use very small drips near the
center of the design, and larger ones toward the outer edges.
See my gallery for examples and
details, particularly example 21, example 22 and example 23.
Background. You can dye a surrounding background color, either
before or after the mandala itself, by pulling up the center
of the mandala and rubber-banding its circumference, then
carefully pouring dye everywhere but inside this circle. I
prefer to do the background first, so as to not risk
covering up any special details on the mandala, but this is
more trouble.
Dye reactions. Place the newly dyed fabric in a warm
place, so that the dye can react with the soda-presoaked
fabric, a minimum of 70 degrees Fahrenheit (21 degrees
C.). Leave it for twenty-four hours at 70 degrees F. (21 C),
or two to six hours at 90 degrees F. (32 C.).
Wash out. Wash your new mandala in cold
water first, then in hot water (if the fabric can stand it)
to rid the fabric of the last traces of excess dye. Most
dyers like to use Synthrapol detergent, available only from
dye suppliers, for this purpose, but regular laundry
detergent will do. If you have used fiber reactive dyes,
your beautiful new
design is now permanent and wash-proof.
 see more answers to FAQs
All of the pages on this site are copyright ©1998‑2026 Paula E. Burch, Ph.D.
This page was created: January 28, 2000;
Last updated: June 18, 2006;
Downloaded: Wednesday, June 17, 2026