This is a guest article contributed by Joyce Vance.
Advertisements
Dye Cotton, Rayon,
or Silk with
Jacquard Procion MX
Fiber Reactive Dyes
Dye Silk, Wool,
or Nylon with
Jacquard Acid Dyes
Jacquard Acid Dye
Buy New $3.14
from Amazon
Dye Cotton, Rayon,
or Silk with
Jacquard Procion MX
Fiber Reactive Dyes
Dye Silk, Wool,
or Nylon with
Jacquard Acid Dyes
Jacquard Acid Dye
Buy New $3.14
from Amazon
Dye Cotton, Rayon,
or Silk with
Jacquard Procion MX
Fiber Reactive Dyes
Dye Silk, Wool,
or Nylon with
Jacquard Acid Dyes
Jacquard Acid Dye
Buy New $3.14
from Amazon


[This article discusses the use of multiple low-immersion dye baths to create delicate color veining amid swaths different colors on fabric. Knowledge of basic dyeing practices, such as mixing stock, is assumed. As in all dyeing, studio space used should be properly ventilated, and a NIOSH particulate mask and gloves should be worn. Never mix utensils or vessels used for dyeing with those used for food.]
My early experimentation with fabric dyeing was as a child in the late 1960s with my grandmother, who enjoyed and was skilled at both tie-dye and batik. It was not until the late 1990s that I returned to dyeing as an adult. I picked up a copy of Ann Johnston’s excellent book on low-immersion dyeing, Color by Accident, and was fascinated by both her process and her results. Johnston’s book encouraged each individual dyer to experiment and, following her lead, I did so over the years. The simple, spiral bound notebook I started to keep track of my early efforts ultimately became a huge volume of swatches, color recipes, and ideas for achieving color and texture.
My experimentation led me to a low-immersion technique whose results I found particularly pleasing. Through much trial and error, I learned that with the right combination of fabric scrunching and dye pouring, along with use of a fixative to cause the dye to strike quickly, I could create soft multi-colored fabrics with delicate veining and strong color patterns. My husband teasingly called it grown-up tie-dye. In 2001, I named it “Crackle Dye”. In this article, I detail my Crackle Dye method as a starting point for others to experiment from, much as I did from Ann Johnston’s instructions.
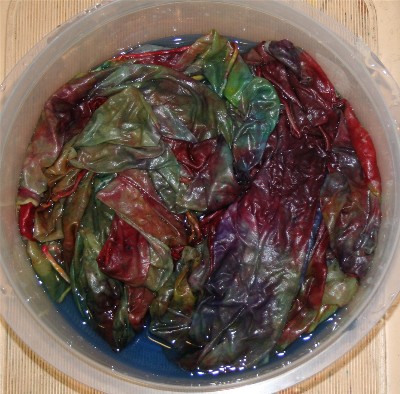
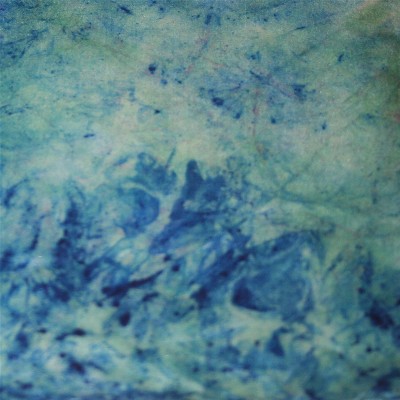
I dye regularly on both protein (animal) and cellulose (vegetable) fibers. This method is suited to both. However, the results that are attainable on finer weight protein fibers like silk charmeuse and silk gauze using acid dyes far exceed the results on cotton in the sense that a much finer line can be achieved in the fabric are my primary interest. However, good control can be achieved on both fabrics with a pre-soak (detailed below) and a little practice. Most of the photographs here show a heavyweight cotton fiber in the dye baths, as it was easier to photograph, however I have also included a few photographs designed to show the beautiful range of colors and fine crackle you can achieve on silk.
The basic rules apply here, as in all dyeing. Cellulose fibers are dyed using Procion MX dyes with a soda ash solution as the fixative. Protein fibers are dyed using acid dyes with a citric acid fixative. Protein fibers must be carefully steamed after dyeing to develop the colors. This is essential to developing the full range of colors on silk. Procion MX will give neither the full range of color on protein fibers, nor will the colors dye true—in other words, there will be a good deal of unexpected color shifting.
Prepare your fabric by scouring it to remove any sizing or other finishing agents that were used in the commercial finishing process. Otherwise, you may have areas in your fabric that will resist taking the dye. I scour my fabric by putting it in a large pot of warm water with a capful of Synthrapol (a mild detergent) on top of a burner and gently simmering. Fabric can also be scoured in the washing machine.

The photograph at the beginning of this section shows the initial soft shade of pewter I chose for this fabric against the final result. The key here is to keep this initial color pale.
Once your fabric has its initial layer of soft color, you need to pre-soak your fabric in fixative. This is essential in developing veining and color separation. The dye strikes onto the fabric when it comes into contact with the fixative. By soaking your fabric in the fixative before immersing it in the dye solution, you allow the component colors in your dyes to separate out in beautiful and mostly unpredictable patterns.
To pre-soak your fabric, create a solution of soda ash or citric acid, depending on the type of fabric you are dyeing, and soak your fabric in a bucket of solution for 15 to 30 minutes. A rough formula is to make a solution of 1/3 cup soda ash or citric acid in 1 cup of water, depending on your fiber, but I encourage you to review Paula's site for directions regarding this preparation, as well as dye stock preparation, both subjects with which this article assumes you have familiarity.
While your fabric is soaking, prepare the dyes you will you use for the Crackle Dye process.
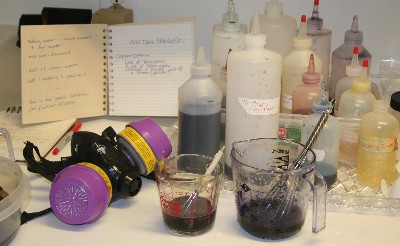
While there are many schools of thought on how to select colors, I find that a color wheel is incredibly helpful in mixing just the right shades for my fabrics. I tend to work off of the basics – a fuchsia or scarlet, a sapphire or turquoise blue, a true yellow, and a black. I prefer the control I get from mixing my own colors. I have a large collection of yard sale mixing cups, whisks, and old canning pots, as well as some glass beakers and plastic squirt bottles. For this method, I prefer to work primarily from squirt bottles. This means that I will mix my dyes at full strength, then strain them through old pantyhose to insure there are no undissolved particles. Finally, I dilute them to the desired shade, keeping in mind that low immersion dyeing requires a weaker dye liquor than traditional large vat dyeing, and pour them into my squirt bottles.
For the basic process, I go through two multi-color baths on top of my initial solid color to achieve Crackle Dye. The first bath uses two colors diluted to pale to moderate shades. The second bath will use two more colors, at darker shades and even up to full strength depending on the depth of color that is desired. A concrete example of color is useful here.
Let us assume I have started by dyeing my fabric a very soft, gray. Now I have mixed my colors for the next two baths. For the first bath, I’m going to use a periwinkle and a medium gray-blue. The periwinkle will be a rich color. The blue is less colorful, and will blend sapphire and turquoise together at a light concentration, with black to dull the color. My goal here is to add depth of color, but in a medium range, not a dark range. Because the fabric has been pre-soaked, the colors should strike almost as soon as they hit the fabric. This offers the added benefit of developing unpredictable halos of color, as some of the colors that have gone into mixing my colors separate out in the striking process.
In the example, I will also mix two additional colors for the second dye bath, one a deep gray and finally a rich purple. These darker colors will be added in the last bath and will create a striking tonal effect.
Note that the color selection is entirely up to you. I often like to mix up bright colors like pink and orange. Do not be afraid to play with the colors. I highly recommend the book Blue and Yellow Don't Make Green, by Michael Wilcox.
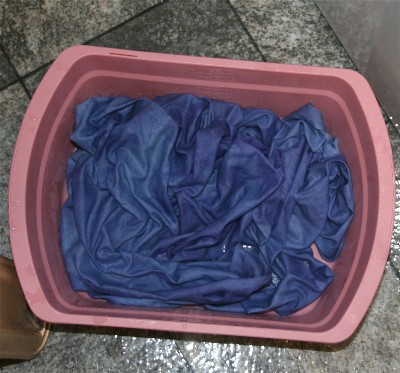
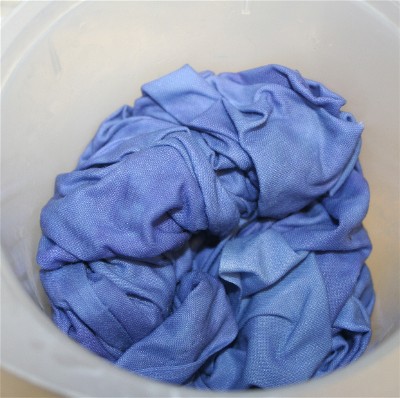
I have learned that one way to achieve even color distribution across the fabric is by paying careful attention to scrunching it. Starting in one corner, evenly pleat the fabric from your right hand to your left in small increments until you have a small pile of fabric in a roughly circular shape. Take the fabric, which is still dripping wet at this point, and mash it down into your container (retain the excess soaking solution). You are now ready for the dyes.
Pour your first color evenly around the outside edge of the fabric, using a wooden spoon or other implement to momentarily push the fabric away from the edge and insure the dye pours down the side of the fabric as well as sitting on top of it. Pour your second color around the inner portions of your circle of fabric and then out along edges, more sparingly. Evaluate how the colors will marry and use that knowledge to determine color placement that increases the organic movement of the colors as the dyes mix.
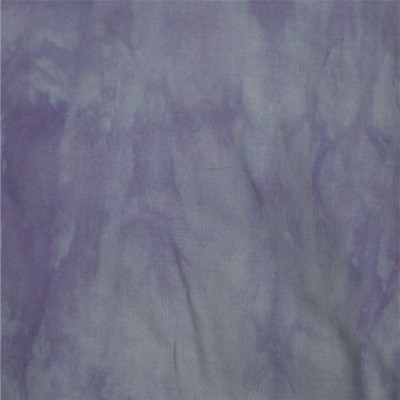
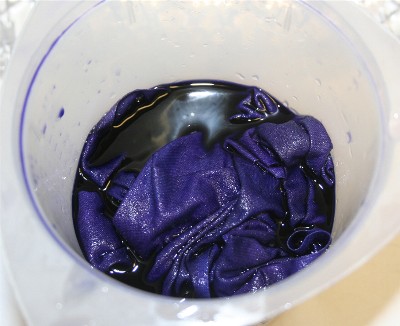
Permit the fabric to batch over night by covering your container in plastic wrap and keeping it in a warm area of your house. You do not want the fabric to dry out while batching, so insure that you have left in just enough liquid to keep the fabric “humid.” (Yes, for those of you who insist, you can let the fabric batch for a few hours and go on to the next step. But trust me, it is not worth it as your colors will not be nearly as intense). You can batch for a much shorter time if you are using a protein fiber, but remember to steam your fabric. Even with protein fibers, I prefer to batch for a good bit of time before steaming to set the colors. Here are the results in our example.
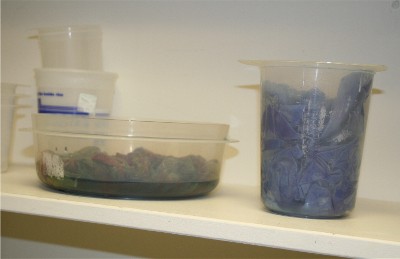
For this step, you will want a much tighter fit for your fabric in the container you select. Select a container that holds your fabric in a tight wad. You want to spread the bulk of the fabric out horizontally in a disc shape, rather than vertically in a cylinder to allow the dyes to saturate evenly across the fabric. Although it is possible to use a cylinder, it is more difficult to get the color to move throughout the fabric and you will have to pay attention to rearranging fabric and re-pouring dye more times that you will if your container permits you to scrunch your fabric horizontally into a shape the resembles a frisbee.
In this bath, you are seeking contrast. You are going to add a smaller amount of much darker color. The first dark color, in our example the dark gray, I would pour sparingly across the fabric in an “X” or in concentric circles. Remember you do not want to overwhelm the previous layer, you are trying to accent it. Insure that the dye moves down the sides of the fabric by pushing the fabric in with an implement and pouring dye down and around the edges.
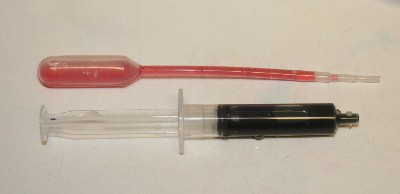
For the darkest color, here the purple, I like to use a syringe or pipette to insert the color precisely where I want in, and pushing down into the interior of the fabric as well as on the surface. As in the first dye bath, carefully flip your fabric over and repeat the color paths on the bottom of your fabric pancake. It should be soaking wet and messy at this point.
Permit your fabric to soak for five minutes or so (this is a great place to experiment – you can proceed without waiting or wait for longer periods of time to see what effect you like the best) and then pour the soaking solution that you retained from your initial soak over the fabric.
Batch your fabric overnight in a nice warm space.
Your next step depends on the fabric your are dyeing. If you are dyeing a protein fiber, such as silk or wool, you will need to steam the fabric as you normally would at this point. Pay careful attention to preventing the dye from smearing by rolling your fabric in newsprint (unprinted) and steaming it suspended on top, not in, the boiling water. (If you have not steamed fabric before, do not let yourself think it is unnecessarily complicated. My first steamer was a converted bamboo vegetable steamer and it worked quite nicely. I still tend to steam my yarns in large canning pots on a rack, although a stovetop rack has been a wonderful addition to the process. I know some people who steam in their dishwashers or microwaves, but I have strong safety concerns and never mix dyes with anything that comes into contact with food in my house.) Steaming will develop the colors on your protein fibers, particularly silk, and you will be amazed by the beauty you have created. At this stage, you may find yourself trying to lure complete strangers into your house to see how incredible the colors are.
Take your fabric and rinse it thoroughly and gently in cool water. If you have a large quantity of fabric, take a large bucket, fill it with water, and gently swish your fabric around until the water is murky. Repeat this step as many times as necessary until the water is clear. Then repeat the process with warm, and finally hot water, as the dye sometimes washes out differentially at different temperatures (I’m not going to bore you on this topic, but trust me, we devoted a sixth grade science fair project in our household to this subject). There is nothing more distressing than washing an item down the road and finding that the dye was not completely removed in the rinsing process. The good news is that in low-immersion processes, the dye tends to exhaust and there will likely not be less run-off than with vat dyeing. But you will be well-served by a slow, persistent rinsing process, especially if you have used reds or particularly deep colors. This takes time and patience is the key.
After you have rinsed your fabric, soak it in a hot water bath with Synthrapol in it for at least ten minutes to insure that all dye molecules that have not firmly bonded to the fabric are removed. You can also add a softener like Milsoft at this stage to preserve the hand of the fabric.
Remove the fabric and dry it, and, Voila, you are done. It is beautiful. It is unique. It is yours. It is Crackle Dye! But wait, there is always the possibility of more.
Your fabric is undoubtedly spectacularly gorgeous at this point. But what if it isn’t? Or what if you want to do just a bit more to it? Here are a couple of ideas.
First off, occasionally, you may find that the colors have mixed to give you a tone you do not like. This is easily adjusted by over-dyeing your fabric, although you run some risk that you will lose the definition in your Crackle Dye. Pre-mixed colors like khaki and bronze or different grays can help you tone a run-away fabric back towards the colors you want. You can even add another Crackle Dye bath for additional color, as long as your second bath was not an exceptionally dark one. Do not be afraid to play.
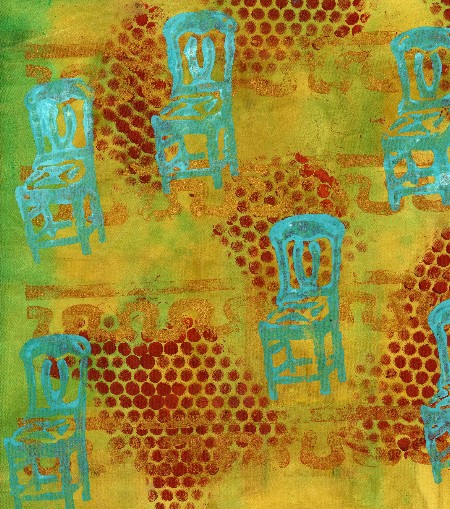
You can embellish your Crackle Dye fabric in a number of ways. I like to use bold rubber stamps on the fabric for all over design. You can also foil the fabric using a product like Amy’s Leaf. Another fabulous option is embossing on the fabric. These are just a few ideas for where you can take your fabric after dyeing it.
Low-immersion has gained in popularity among hand-dyers in the last decade. There are numerous ways to accomplish satisfying results. This article details the method I use, a multi-bath process named Crackle Dye. Although it is a time-consuming, labor intensive process, the distinctive “Crackle” separation that results from the layered baths is a result that I find is worth the investment of time and effort. I encourage you to experiment with this process and look forward to hearing about your results and how you use your fabric!
Page created: October 13, 2006
Last updated: March 30, 2012
Downloaded: Sunday, July 26, 2026